Building a PC, in a year 2020
I’ve built myself a PC. Last time I did this was almost 20 years ago. Some things are drastically different. Some are remarkably the same (mostly the bad parts).
This started fairly innocuously. On my regular YouTube crawling through videos related to espresso craft, its algorithm somehow suggested this video of someone building their Hackintosh. Nothing unusual per-se but it intrigued me due to two things:
- the builder casually uses AMD Ryzen 5 processor
- it was all packed inside a wonderfully small case that looked super clean (Louqe Ghost S1)
I’m MacBookPro-only for last 10 years thus I had only passing knowledge about the state of Hackintosh builds. I knew people were trying to use AMD’s CPUs because their were cheaper + they had more cores than Intel for less money (which jives with what I heard from friends using PCs). But I did not know it became such common practice to build PCs running macOS with those CPUs.
The second point was far more interesting to me. The build-your-own PC thing I did 20 years ago usually involved very large cases, large motherboards and fairly small graphic cards which you insert vertically into the motherboard. HDDs were huge, noisy and slow. But here was someone building with:
- a 6-core CPU into a very small case
- with huge-ass graphics card (Radeon Vega 56) placed side-by-side with the motherboard much smaller than said graphics card.
- Its entire storage was NVMe SSD not larger than a memory module.1
That video was my introduction into the world of Small Form Factor cases, ITX sized motherboards, PCIe riser cards and intelligent use of case volume while maintaining performance and near-silent operation under even the heaviest of loads. It was a short hop from there to Optimum Tech YouTube channel.2
That was the hook and the sinker. And here I am, 6+ months later, with a bunch of hardware components and 3 (yes, three) wonderful SFF cases on hand.

Hardware list3
Let’s start with the core of the build: CPU choice. I picked AMD’s Ryzen 3000 series, starting with fairly inexpensive model with TDP of 65W which can be easily air-cooled without much fuss and bulk.

- AMD Ryzen 5 3600 CPU:
€190
In the future — after I make sure this system is perfectly stable across some months — I will upgrade to 12 (3900X) or 16 (3950X) core Ryzen 9 CPUs for which Intel simply has no answer in their respective price range (under $1000 in US). The only thing I need to switch for this is the CPU itself. Everything else can stay the same. This is not the case in Intel land where you can build with single-core monsters like i9-9900K but if you want to upgrade to say 14 cores, you’ll need to switch motherboards and possibly memory too.
My motherboard choice is overkill for this particular build but it’s one part where there’s little choice in AMD land:

- ASRock X570 Phantom Gaming-ITX/TB3 motherboard :
€220
Reason: Thunderbolt 3, a-future-proofing-must-have for me. This board is one of the only two ITX-sized motherboards that has it integrated into I/O shield (the other one is also from ASRock but for Intel CPUs). That means I won’t need additional PCIe card for TB3 ports; ITX-sized boards have only one PCIe slot which I need for the graphics card. Speaking of which:

- Sapphire Nitro+ RX570 8GB graphics card:
€100(used)
This card is based on Polaris GPU architecture and is close to 3 years old at this point but still kicks some serious numbers. These cards are still being sold new, today; you may have noticed its brethren RX580 as the base graphics card for newest Mac Pro.
Note: since Catalina 10.15.2, Apple added support for AMD’s new Navi-based chips, including RX5500 and RX5700. Any of these will be way faster than anything you can get included in Mac mini or MacBook Pros.
I chose card with 8GB memory versus 4GB, since it shows significant gains in a lot of games, especially those that employ a lot of textures.
Because of the layout of this particular motherboard with tall heatsinks and I/O shroud, I opted for low-profile memory sticks to keep at least one side open for easier cabling and heat-sink installation.

- Corsair Vengeance LPX 16 GB (2 x 8 GB) DDR4 3200MHz CL16 :
€71
These modules are significantly shorter than most while still being very performant.
The current build is housed in wonderfully small case (hence the need for ITX motherboard) and appropriately small power supply unit:
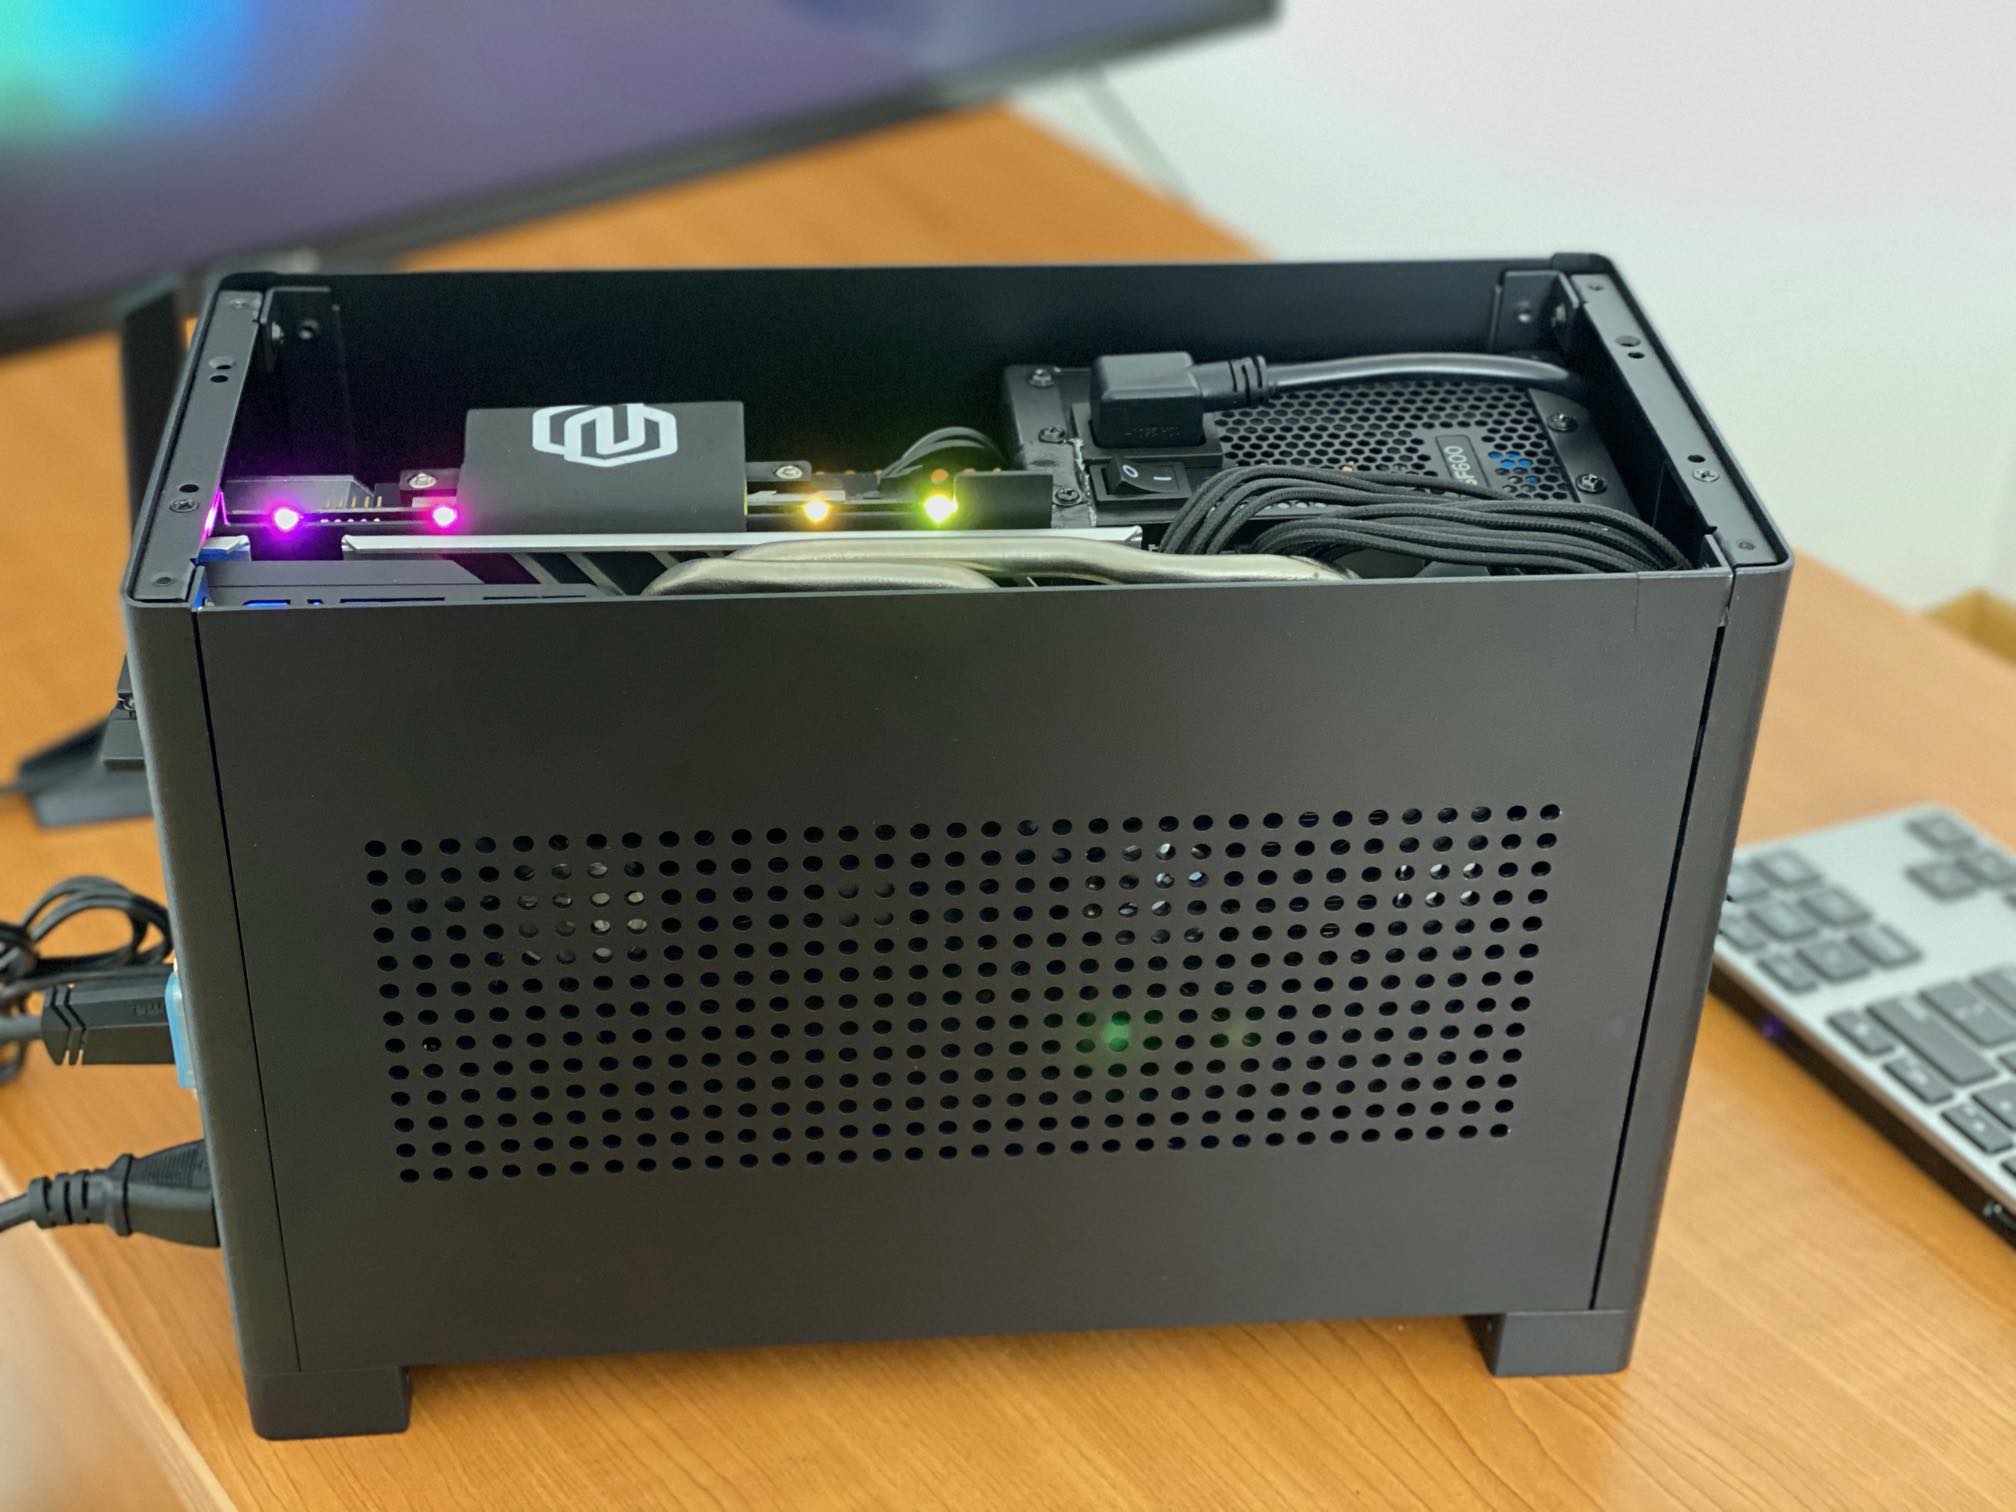
- Nouvolo Steck v1.1 SFF case :
$150(plus 50€ for customs 😭)

- Corsair SF600 Platinum SFX PSU :
€116
I very much prefer SFF and I’m far from alone. With the case being so small (8.7L of volume in its base form), I needed some serious cooling to make it as silent as it could be. Thus I opted for the best:
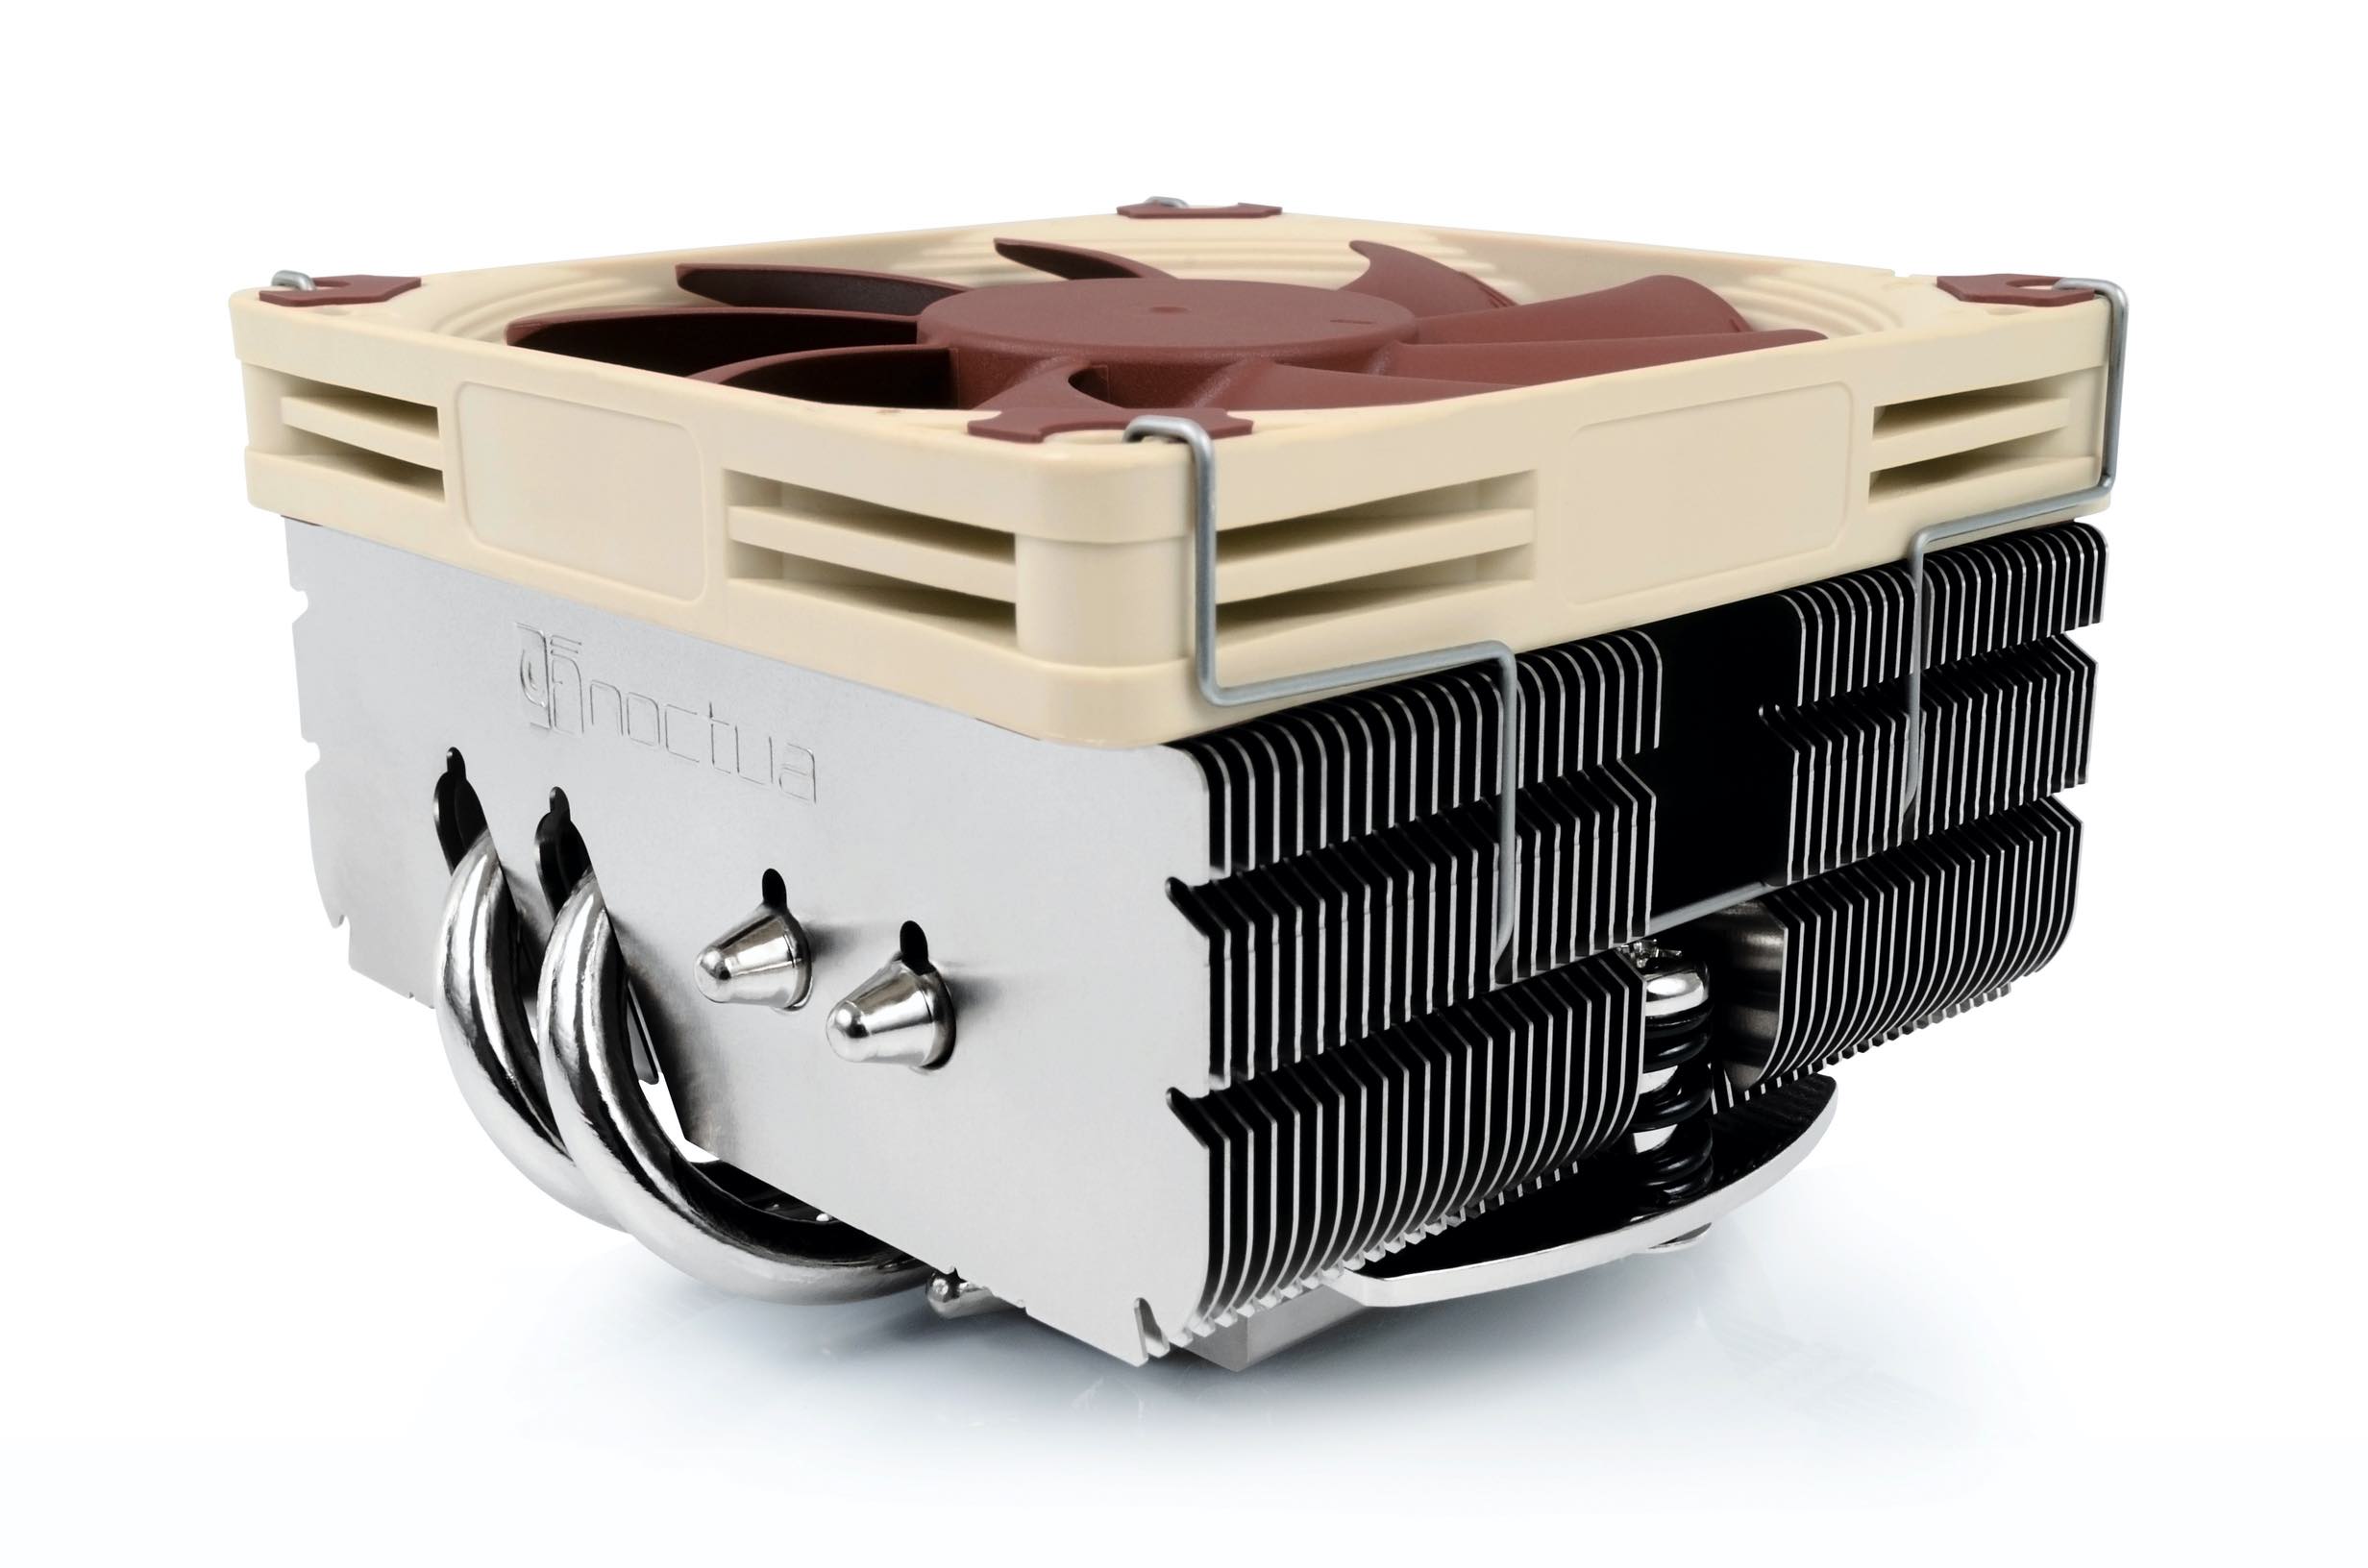
- Noctua NH-L9x65 CPU cooler:
€53. This air cooler is actually made for Intel CPUs but this particular board by ASRock is using Intel cooling mount because their design requires less physical space. - Noctua NF-A12x25 case fan :
€32 - Noctua NF-A9 PWM fan :
€20(used it to replace 9x14 on the CPU cooler).
Finally, the SSDs:
- ADATA XPG 8200 Pro 1TB NVMe SSD:
€180 - Samsung 860 EVO 500GB SSD:
€80
This motherboard has only one m.2 NVMe slot, on its back. And while X570 chipset supports PCIe 4.0 – thus potentially giving me 5GB/s speeds – I would also get large upswing in generated heat. Which is really not feasible in my case due to small chassis and its sandwich layout where the SSD is dead-centered between motherboard and graphics card. Honestly I don’t see the benefit in my workflows for such extreme speeds, especially since this XPG drive gets me 3GB/s and that’s plenty enough. XPG drives come with small thermal pad which (so far) works really well to dissipate heat.
The motherboard has Intel’s AX200 card which supports WiFi 6 and Bluetooth 5, integrated into the I/O shroud at the side of the motherboard. It also features 1Gbit LAN (model is Intel I211AT), a pair of 10Gbps USB-A ports, another pair of 5Gbps USB-A ports and the one mentioned Thunderbolt 3 port which is of course working as USB-C 10Gbps port.
Build
I made a video of the whole build, with all the important details shown.
Important bit is the cooling. I had to cut a hole through the bottom plate so the Noctua 12x25 fan can freely pull the cold air inside the case. This fan directly cools off the PSU and back of the GPU — exactly where the hot air is going out on this particular model.
But there is no room in this case to place another fan below the motherboard. Thus the CPU cooler fan must work really well and I found that
- default 9x14 fan is not enough
- side panels do not have nearly enough holes to allow the fan to work its magic.
Thus I replaced the 9x14 with 9x25 and I keep the CPU side panel off since 25mm fan is 4mm too tall for the side panel to close. This change brought me 15-17ºC drop in pick CPU temperature (from 87 to ~70).
This setup seems optimal for this case and the fans are operating more or less silently since they are all controlled by the motherboard which adjusts their speed as needed. Fan in the Corsair PSU is barely ever working (it’s 0 RPMs until 300W), since the power draw is rarely that high.
I ran extensive tests with this hardware in Windows, making sure that everything works tip-top.
So…what’s the point?
Readers of my blog can tell that I’m an Apple customer, through and through. Thus it’s fair to ask — why build this?
First — it’s nice to build something physical; it’s really nice being part of great community like SFF. Community of people giving a lot of thought to proper cooling, silent running, efficient use of space. I always disliked big tower cases and this is such a fresh and inspiring approach to home PCs.
If you want to be thoroughly inspired, browse through SFF.Network’s Concepts & Custom Projects sub-forum to witness hw enthusiasm at its best. People are genuinely interested to build their PC to be pretty on the inside as much as outside. If there’s an Apple-esque approach to PC builds, that has to be the one.
Personally, the only part I don’t care much for is obsession with RGB lighting. You’ll not find it featured front and center inside my build.
What I wanted from this machine: be small, be performant, work silently and reliably. Key thing: reliable. Personal computer is a tool for me and no matter how much I love the process and the final look – I need it to work, not just look pretty on the table.
The trouble
As I said before, I picked this ITX motherboard because it had Thunderbolt 3. A very, very rare thing outside of Intel-based boards. A very rare thing on ITX motherboards, period.
Initially, it seemed fine. I could attach my external USB-C enclosure with SSD inside, it copied fast, worked really nice. But I could not boot from it.
I got into BIOS / UEFI, tried everything I could think of, no dice. Upgraded to latest BIOS (2.00), still nothing. It simply never shows as boot option. I then tried to boot with same external disk over USB-A 3.2 port; Windows 10 (which was on external disk) would start loading and then spin indefinitely without switching to the desktop. Ugh!
I downgraded the BIOS version back to 1.00 (initial release) and then upgraded through all available versions, one by one.
- Booting from TB3/USB-C does not work with either of them. 😡
- USB-A boot worked fine up to BIOS 1.70 (I think) but it does not work on 2.00 (latest release). 🥵
To make matters worse, after trying all these BIOS upgrades, USB-C port stopped working even in Windows 10. Thunderbolt driver from Intel was showing as properly installed, it would show the Port 1 as active, the disk attached to it would spin up and be turned on. But it would never appear in Windows. 🤬 Thus I downgraded back to BIOS 1.00, then updated directly to 2.00 so at least the USB-C and Thunderbolt 3 attached disks appear in Windows. Gave up on booting from USB into Windows, hopefully some future BIOS update will fix this (since it does work until 1.70).
What a mess.
I found huge thread on TonyMacX86 forums about a Hackintosh build using ASRock X390 Phantom Gaming ITX/ac motherboard. It’s a model which by all accounts is sibling version of my board for Intel CPUs.
Z390 board also has Thunderbolt 3 port on its back I/O panel and BIOS for that board has an entire section dedicated to Thunderbolt. Here, on my board, there’s only one singular option that says Thunderbolt Enabled/Disabled and that’s it! As annoying as this is right now, I’m hoping it means that some future update will bring those same options to X570 version as well4.🤞🏻
▪︎❖▪︎
Makes you appreciate how wonderful it is that when you buy say MacBook Pro, you unpack it, start up and it just works. I switched to using laptops exclusively in early 2000s and I honestly forgot just how much of a pain this build-your-own computer can be.
When it works, it’s a pleasure to build, nip & tuck the cables inside, close it off with nice chassis. Building a PC in SFF case is very zen, it can be an art form. I just wish the software controlling it (BIOS/UEFI in the first place) was more reliable. I guess some things never change and hardware components for DIY builds are still hit or miss.
But seriously…why?
Ehm…here’s a hint. Double-digit-core machines I want from Apple are way too expensive for my needs. Thus I wanted to see would this work, for my specific projects and my needs.
In general, it does.
However, one small issue is enough to derail all your plans and in my case, it appears that with Xcode 11.3 on Catalina, there’s a blocking issue with watchOS 6.1 Simulator / SDK when ran on AMD CPUs.
I was told it works properly in Mojave but it’s not really an option to downgrade given that upcoming Xcode 11.4 requires Catalina.
Issues like this is why I’m in no rush to replace my MacBook Pro with Ryzentosh. Why I said that this is a long-term project. I will use this initial build to test the waters in upcoming months and see how things change along the way.
-
I did know about that at least, as I used one with my MBP. ↩︎
-
Ali Sayed is an amazing presenter and perfect example of creators YT should be proud of. I think I watched dozens of his videos, many of them multiple times. ↩︎
-
I’m listing prices next to each component so you have a rough idea how much the components cost, in Europe at least. ↩︎
-
Especially since the TB3 controller on my board is Titan Ridge, a more powerful model than Alpine Ridge on ASRock Z390 board. ↩︎